Last modified: January 26, 2023
Homework 1
Part 1: Clone the Repository
Each person in your group does this:
- Click the Clone a Repository from the Internet button.
- Click on GitHub.com.
- You should see your repository listed below.
- Select the repository.
- Click on the choose button to select the location you want to clone your repository - pay attention to where it saves!
- Click on Clone when you have chosen a location.
Part 2: Edit README.md
One person in your group does all of this while others help.
- Open the README.md file in a text editor of your choice (Notepad, TextEdit, or Sublime Text)
- Replace the contents with the names of all team members at the top of the README.
- Save your changes.
- Go to GitHub Desktop.
- You should see the changes to the README.md show up on Github Desktop
- Type a commit message and press “commit to main” to save changes to the repo.
- GitHub Desktop will prompt you to push (upload changes to the online repo).
- Press the push origin button to upload your changes.
Part 3: Team Members Pull
Now everyone else in your group does this:
- In your web browser, reload the repository page.
You should see that your teammate made some commits.
The README.md should now have your names in it.
- Go to the GitHub Desktop app to download those changes onto your computer.
- Press the “Fetch Origin” button.
If you did previous sections correctly, you should see a pull button appear.
- Press the pull button to download changes that have been pushed since the last time you cloned or pulled.
You will see your names if you open the README.md file in a text editor.
You can also click on the history button to see a list of commits which should include the one made by your teammate.
Part 4: Change, Add, Commit, Push
One person in your group does all of these:
- Open the project in Greenfoot, create a subclass of Actor named Bee and pick an image
- Commit and Push the changes to your online repository.
Part 5: Pull Changes
Now everyone else in your group does this:
- Pull changes from the online repository using the GitHub Desktop app
- You should now see the class that the first person created.
Part 6: Pull Before Pushing
Now everyone in your group does this:
- Open the project in Greenfoot
- Create another subclass of Actor with any name and any image
- Each member chooses a different class name
- Close Greenfoot
Note: You should always close Greenfoot before working in GitHub Desktop for two reasons:
- Greenfoot will not always detect all the changes made to project files outside of Greenfoot while the project is open.
- Greenfoot saves information such as class images in “project.greenfoot” when the project is closed, so it is better if all that has been completed before committing, pushing, and especially pulling.
- Commit and Push the changes to your online repository.
Only one team member will successfully push (whoever is first) because the first person pushed commits that have not yet been pulled by the other two. To fix this, the other team members must pull changes from the remote before pushing. GitHub Desktop will prompt you to pull.
Part 7: Change the Same File
Now everyone in your group does this:
- Open Greenfoot
- Open the Bee class and edit the code to add an instance variable, constructor, method or comment (each person should add something different).
- Commit and Push the changes to your online repository.
- Only one team member will successfully push (whoever is first) because the first person pushed commits that have not yet been pulled by the other two.
- This time there will be a merge conflict though. See the next section to learn how to deal with it.
Possible Issue: Divergent Branches Error
If you get the error saying: "You have divergent branches and need to specify how to reconcile them.":
- From GitHub Desktop, got to the menu Repository → Open in terminal (mac) or Open in Command Prompt (windows)
- If it says you don't have git, then download and install git
- For Windows, you can just click on the Download 2.36.0 for windows and run the installer (version will differ)
- For MacOS you might just be prompted to install the commandline tools, which includes git. You are welcome to do that but it is a bigger download and takes longer than just installing git.
- The fastest and easiest way to install git for MacOS is to use the binary installer:
- Click on the green download button.
- When downloaded, go to the downloads folder, right click and say open to open it.
- You may be warned that it is a file you downloaded (so the MacOS system can't be sure it is safe). Say you want to open anyways beause you DO know it is safe.
- If you don't see an option for "open anyways" then go to the Apple Menu → System Preferences → Security and Privacy → General → You should see an "open anyway option here." Click it to allow this app to open.
- If you had to download and install git, then you will need to exit and reopen Github Desktop, then do step 1 again
- Once you have installed git and opened the terminal, you can type in the following command and press enter: \
git config --global pull.ff true
- Now when you attempt to pull it will use that configuration and allow you to continue.
Part 8: Merge Conflict
One of the team members that failed to push should pull to get the latest commits. The team will fix the merge conflict together.
- Press the fetch button.
- You will then see a pull button - press it.
- You will get a message saying there are merge conflicts
- Open the project in greenfoot
- Go to each of the files listed as having a conflict and fix it as described in the next section.
Merge Conflicts
Note: Pull Before Push
If try to push your code changes to an online repository there's a good chance that one of your team members already changed something and now your copy of the project is not the most recent. In such cases, you will you get a "rejected - non-fast-forward" error message telling you that you don't have the most recent copy of the project. \
Before you can push your code, you must pull the most recent version of the project and tell Git how to integrate your code changes with the latest online version. Often, this leads to Merge Conflicts.
A Merge Conflict occurs when the code you worked on interferes with the most recent pull version (which you are required to download before uploading your code!) In such cases, Git needs you to tell it how to combine your changes with the most recent pull version. Git tells you which files have conflicts and marks them to show you what the conflict is (see next section).
Resolving Merge Conflicts
Open files marked as a Merge Conflict and you will see something like this:
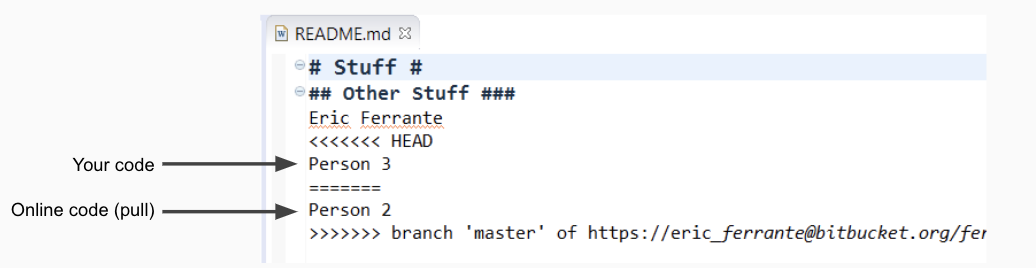
- The section between <<<<<<< HEAD and >>>>>>> branch 'master'… contains the conflicting code.
- Code before the ======= is your code. The code after the ======= is the most recent pulled version.
- You need to decide what to keep/delete and then remove the <<<<<<< HEAD , ======= and >>>>>>> branch 'master'… markers.
For example, if you wanted to include both lines of code and change the order so that Person 3 is after Person 2 then you would change:
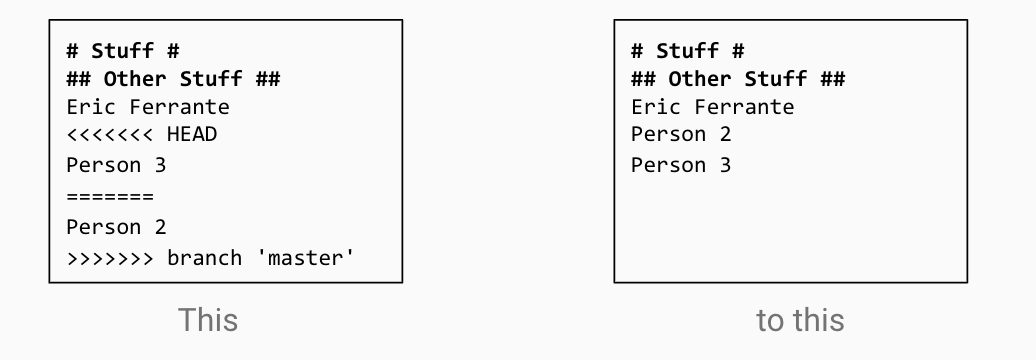
Modify each conflicting file and save the changes you want. Then, commit and push so the online repository has the merged changes.
Part 9: Journal Entries
- Once every student has successfully committed and pushed their changes, you will be ready to complete the first journal entry.
- Each student should add a text file named in the format “LastNameFirstNameJournal.txt” to the repository where they will write journal entries. You can create the file locally and commit and push it or create it on bitbucket directly. Add an entry in your journal section that discusses what you learned today. If you want to make your journal in markdown format that is fine (in fact it will look nicer), just name it LastNameFirstNameJournal.md
- Commit and push your journal.
Example Journal
Ted McLeod
Period 2 Team 15
Journal
Mon 5/10/2021 in class - 1 hour
My team and I discussed exactly what game we were making and decided to make a platformer. My part is to create the player class and get the physics/jumping working. I created the Player class and worked on applying physics to the player by adding a dx, dy and ddy properties. I gave the player initial values for now so I can see the player immediately move in an arc when I press run. I tried to make the player stop at the bottom edge, but I haven't managed to get that working yet. I will work on that for HW.
Mon 5/10/2021 at home - 45 minutes
I finished the basic physics in the Player class so the player can now move in an arc and stop when it reaches the bottom edge. I also prevent the player from going off the left and right edges. I added keyboard controls so now the player can move left and right with a and d and can jump by pressing spacebar. I am starting to work on platforms now, but it doesn't really work yet.
Tues 5/11/2021 at home - 30 minutes
I have a basic platform system working now. I had a lot of trouble figuring out how to actually get a reference to the platform because I kept getting compiler errors, but I finally resolved those issues by using getOneIntersectingObject and saving the result in an Actor. At first this kept crashing with a NullPointerException, but then I added an if statement to check for null. The player can jump up and land on a platform and doesn't fall through it now, however it is still a bit glitchy because if a player jumps up into the bottom of a platform, it teleports the player to the top of the platform instead of just making the player fall back down.
Part 10: Game Idea
Your goal is to create a short but complete game. Don't brainstorm a Legend of Zelda masterpiece or a fighting game with 50 characters - you aren’t Nintendo. However, any game can be scaled back to an appropriate length. This might be only three awesome levels or two-stage maps. Or, perhaps it's Chapter 1 of an adventure game. Finally, choose a game that fits your skill level. You can create a clone of an existing game, create your own mashup of existing game ideas or come up with a unique game that doesn't exist.
If you already have a game idea, skip ahead to the next part. Otherwise, spend time exploring the games below to get ideas.
Nearly 10,000 games! A bunch of these are Flash games that may not work in your browser, but there are LOTS here that don't require Flash.
5,000 more games! Console games. Original Nintendo (NES) games will be the easiest to code.
Part 11: README.md/Submission
- Open your README.md file in a text editor like NotePad or TextEdit or Sublime Text \
Note that the README is a markdown file (.md) which is a markup language used to turn plain text into formatted text using special markers.
- For example, surrounding text with # Title here # creates a large Title here \
*And surrounding text with more ### Title ### creates a smaller *Title
- If you have time, read this Markdown Tutorial and play around. Otherwise, continue.
- Copy and paste this template into your README (Username: java, Password: happysparky)
- Fill out the information for your game.
- Commit and push your changes.
When finished with the previous instructions, discuss your plans for the game you wish to make. You don't have to have every detail figured out, just a general idea of what the game will be. Once you have decided on a game, edit the README.md file to add a description of your game. The README.md should have a list of your names at the top and a game proposal.