Last modified: May 23, 2023
Image Lab HW 3 - Color Filters
Before starting this lab make sure you have completed the previous image labs.
Here is a color filter template:
ColorTemplate.java
In this lab, you will create at least three color image filters for the ImageLab.
You may choose among the options below or you may come up with a filter idea of your own.
Two filters may be a conversion from your three Monochrome Filters,
at least one should be a totally new color filter that was not one of your B&W filters.
Here are a few additional filters designed for color:
Note: In the following instruction, "monochrome", "black and white", "B & W" will be used interchangeably.
Bronze Filters
ThreeDee (Color)
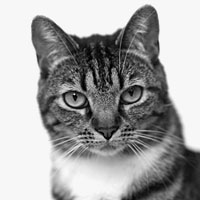
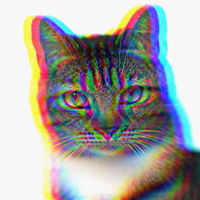
You can achieve the old Blue-Red 3D glasses effect as follows:
- Shift the blue channel pixels left by an Offset value
- Shift the red channel pixels right by an Offset value
- Keep the green channel pixels unmodified
When your loop boundaries get close to the image edge, your program will crash with an ArrayIndexOutOfBoundsException because you can't shift pixels to a location outside the array boundaries. To avoid this problem, either modify your loop boundaries or add if-statements to avoid going out of bounds.
Note: I tested this effect with Blue-Red 3D glasses and it works!!
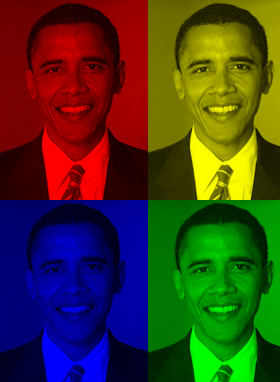
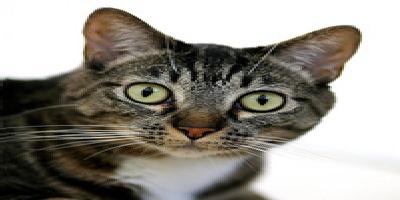
Obama (Color)
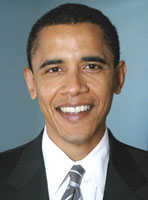
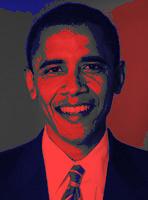
You are always free to create your own filter. I created this one myself. Here's my logic:
- In addition to the Red, Green, Blue, and Alpha channels, also grab the B&W pixels and store them in an array (just like you did for the B&W filters).
if (the B&W value of a pixel is greater than 127 + 20) {

keep the red channel the same

make the green channel equal to 25% of the B&W value

make the blue channel equal to 25% of the B&W value

}

else if (the B&W value of a pixel is less than 127 - 20) {

keep the blue channel the same

make the red channel equal to 25% of the B&W value

make the green channel equal to 25% of the B&W value

}

else {

make the red channel equal to 50% of the B&W value

make the green channel equal to 50% of the B&W value

make the blue channel equal to 50% of the B&W value

}
FourColor
Create your own artistic masterpiece with the Four Color filter. Show below are four of the five easiest hues to generate: Red, Green, Blue, Yellow, Cyan, and Magenta.

Here are some hints for Four Color:
- Create a new image array that is twice the size of the original
- Before working on the four colors, try to get four copies of the original in the right places. It's a matter of adding a shift amount to row/col.
- To get the monotone colors, set whatever color channel combination you want to the B&W value of the original image at each pixel location. For example, to get the red image shown above set the Red channel equal to the B&W value and set the Blue and Green channels to zero.
Image Tile (Color)
A common way of texturing the ground in video games is by repeating a tile image.
To repeat an image you need to fully understand the modulus function (%). To create this filter:
- Prompt the user to enter the new image width
- Prompt the user to enter the new image height
- Loop through the rows/cols of the new image and use the modulus operator to figure out which part of the original tile to place at the current row/col in the new image.
- Your filter should work for a new image of any user-specified size
Double Wide
One way to write this filter is to take each pixel from the original image and create two copies of it side-by-side in the new image. For example, take the first pixel at (0, 0) in the original image and copy it to the new image at positions (0, 0) and (0, 1). Then take the next pixel in the original image at (0, 1) and copy it to the new image at positions (0, 2) and (0, 3). In general, (R, C) in the original image maps to (R, 2C) and (R, 2C+1) in the new image.
Bronze Skew

Think of the original image above as a series of horizontal rows stacked on top of each other to form a square picture. Now take row 1 and shift it over by 1. Then take row 2 and shift it over by 2. Shift row 3 over by 3, etc. After you have Bronze Skew working, why not give Silver Skew a try?
Things you'll need to plan out on paper first in order to implement Bronze Skew:
- How do you determine the width of the new image?
- How will you set the color of the deadspace pixels? (Black, in the example above)
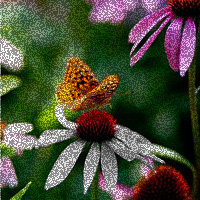
Noise (Color)
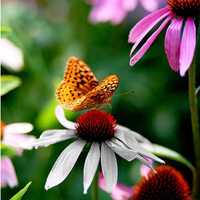
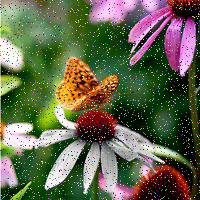
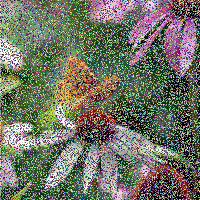
A noise filter adds randomly colored pixels to an image. Prompt the user for a percentage and then add the appropriate number of randomly placed pixels, each of which is a random color.
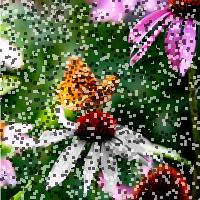
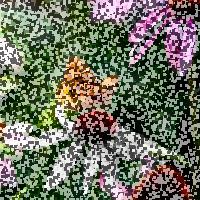
Grain (Color)

One way to simulate film grain is to add transparency to random pixels. In the center image above, about 80% of the pixels were modified by making them 20% transparent. In the right hand image, about 90% of the pixels were modified by making them 40% transparent.
Silver Filters
TV Static (Color)
One way to simulate tv static is to add large blocks of black/white pixels to random locations. Adding pure black and white pixels to a color image didn't look good to me so I averaged the black/white pixels with the original pixel colors. Here' my algorithm:
- Choose a random pixel on the image
- Flip a coin and choose pure black or pure white with equal probability
- Set the chosen pixel to black/white according to the coin toss.
In order to get larger blocks of static fill in the surrounding pixels with the same color like this:
 becomes
Once you have pure black/white static working, modify your algorithm to generate color static by setting the color of the pixels to a weighting of black/white and the original center pixel color. The following ratio works well:
New Pixel Color = (Black/White)60% + (Original Center Color)40%
Effectively, this gives you a custom transparency effect
Silver Skew
Bronze skew was essentially hard-coding a specific skew. For Silver Skew, throw out everything you did for Bronze Skew and start planning from scratch. This time you must allow the user to enter any skew angle. The skew angle is how many degrees from vertical the left edge is. In the example above, look at the two black dead-space triangles. The small angle in them is 18 degrees.
If you don't know your trigonometry, then instead of a skew angle, let the user specify how many pixels to offset the top row by. In the example above, the top row is skewed by 80 pixels.
To fully early your Silver medal, does your filter allow negative angles (or negative offset amounts) in order to skew the opposite direction?
Optionally, you can antialias each pixel to get a smoother albeit slightly fuzzier image.
Horizontal Stretch

This is a generalized version of the Double Wide filter. The key to writing this filter is proportions and type casting decimals into integers. Given any position on the new image (R, C), you need to figure out which pixel to grab from the original image.
Once you have a working version of Horizontal Stretch, try to imlement Anti-Aliasing. Anti-Aliasing is a technique of averaging pixel values with surrounding neighbors in order to get a smoother look. No more jagged edges!
Here's a comparison of the regular output and anti-aliased output. Notice the ear edges. Ask Mr. Ferrante if you would like hints on anti-aliasing.
Gold Filters
- Fisheye Effect (called Spherize in Photoshop)
- Unsharp Mask
- 3D Perspective
To ask users for input, you can use JOptionPane:
String inputValue = JOptionPane.showInputDialog("Please input a value");

// to get the value as an int
int val = Integer.parseInt(inputValue);

// to get value as a double
double val = Double.parseDouble(inputValue);
Color Chooser
If you want to let the user choose a color as a parameter for your filter, you can bring up a color chooser as shown in the example below:
/** At the top of the file **/
// Import Color and JColorChooser classes
import java.awt.Color;
import javax.swing.JColorChooser;

/** in your filter method **/
// Prompt the user to enter a color.  Method returns the color chosen.
Color c = JColorChooser.showDialog(null, "Choose a Color", Color.BLACK);

// Get the red, green, and blue values
int red = c.getRed();
int green = c.getGreen();
int blue = c.getBlue();

System.out.println("r: " + red + ", green:" + green + ", blue:" + blue);
Submission Instructions
Once you have 3 or more new filter classes written, at top of every filter file you created, insert the following comment to indicate:
- name
- period
- date
- Explain what your filter does.
Name each filter class using the convention PX_LastName_FirstName_FilterName. For example if you were in 3rd period and named Michael Wang and your filter was a vertical flip, then you would name the class P3_Wang_Michael_VerticalFlip. This should create a file in the filters folder of your project named P3_Wang_Michael_VerticalFlip.java, which is the file you should upload here.
Submit all 3+ filter .java files below.
You must Sign In to submit to this assignment